It seems as if Microsoft does not take multi-monitor support too seriously. With their new OS (Windows 8) they have added some additional multi-monitor features, but still did not address the common problem of the cursor slipping into your second screen so easily. With the addition of "charms" in Windows 8 the need to limit your cursor to the boundaries of a specific screen is essential because charms are only activated when your pointer is within just a few pixels of the edge of the display.
The solution to this problem can be found through Mouse Trapper, which I developed. Mouse Trapper is a program that prevents the cursor from slipping into another display in a multi-monitor setup by requiring a hotkey to be pressed in order to allow the pointer to pass into another screen. After which, the pointer is trapped in that display until the hotkey is pressed again. The interface is very simple and self explanatory.
A new an enhanced version has just been released, featuring the ability to select which monitors have slipping protection, and a wonderful cursor locator. You can find all the details about Mouse Trapper and then newest version here.
Mouse Trapper has been featured on several sites, including CNET:
http://download.cnet.com/Mouse-Trapper/3000-2317_4-75878300.html?tag=rb_content;contentBody
And others:
http://operating-systems.wonderhowto.com/how-to/use-hot-corners-more-easily-dual-monitor-windows-8-setup-using-mouse-trapper-0140289/
http://www.softepic.com/windows/system-utilities/system-miscellaneous/mouse-trapper/
http://www.soft82.com/download/windows/mouse-trapper/
http://www.addictivetips.com/windows-tips/stop-mouse-cursor-from-slipping-to-secondary-monitor-in-windows-8/
Sunday, December 30, 2012
Thursday, August 16, 2012
ProgressBar not Updating Fix - C#
It has been sited by many StackOverflow questions that, usually when using a BackgroundWorker, your ProgressBar will not update correctly when using C#. I do not know why this happens, however some people suggest that it is because of the threaded interface in Windows Vista and Windows 7.The ProgressBar would get to about 75% full when it should have been at its maximum, and would revert back to 0% before it was fully drawn. Here is what that looked like:
And this is the example code I used:
However, Mark Lansdown from StackOverflow found a very useful solution, taken from this question.
What he suggested is to draw the value, then draw the value minus 1, because that would force a redraw on the ProgressBar. To to that, I just changed my ProgressChanged event to:
And the result is that the ProgressBar will now be smoothly redrawn to 100% before it is reverted.
And while this is most certainly strange behavior, I can verify that it works, and now the ProgressBar will fill all the way up.
I hope you enjoyed!
private void backgroundWorker1_DoWork(object sender, DoWorkEventArgs e) { for (int i = 1; (i <= 100); i++) { // Perform a time consuming operation and report progress. System.Threading.Thread.Sleep(20); backgroundWorker1.ReportProgress((i )); } } private void backgroundWorker1_ProgressChanged(object sender, ProgressChangedEventArgs e) { progressBar1.Value = e.ProgressPercentage; if (progressBar1.Maximum == e.ProgressPercentage) progressBar1.Value = 0; }
However, Mark Lansdown from StackOverflow found a very useful solution, taken from this question.
What he suggested is to draw the value, then draw the value minus 1, because that would force a redraw on the ProgressBar. To to that, I just changed my ProgressChanged event to:
private void backgroundWorker1_ProgressChanged(object sender, ProgressChangedEventArgs e) { progressBar1.Value = e.ProgressPercentage; if (e.ProgressPercentage != 0) progressBar1.Value = e.ProgressPercentage - 1; progressBar1.Value = e.ProgressPercentage; if (progressBar1.Maximum == e.ProgressPercentage) progressBar1.Value = 0; }
And the result is that the ProgressBar will now be smoothly redrawn to 100% before it is reverted.
And while this is most certainly strange behavior, I can verify that it works, and now the ProgressBar will fill all the way up.
I hope you enjoyed!
Center A Form to another form in C#
Recently, while I was using C#, I had an issue. I wanted to center a form in the middle of another form. After drawing a chart and doing some math, I have come up with this piece of code:
Here is a picture of this:
I hope it helps!
form2.SetDesktopLocation(form1.Location.X + ((form1.Width / 2) - form2.Width / 2), form1.Location.Y + ((form1.Height / 2) - form2.Height / 2));What this code actually does, is it first gets the location of form1 X. It then adds that to form1 Width / 2, and subtracts that from form2's width / 2, and does the same for Y. It does that, because you get the X position, and that position needs to be in the center of form1's width. Then, you need to factor in half of form2's width per side, because form1's width was divided by 2. Don't worry if you do not understand. This code assumes the form you want to center is form2, and the form you want to center it around is form1. You have to create a variable for the current instance of form1 and form2. Here is an example of that:
Form1 form1 = (Form1)Application.OpenForms[0];What this code does, is it gets a current array of the open forms. If form2 is your child form, and form 1 is your main form, form1 would be position [0] and form2 would be position [1].
Here is a picture of this:
I hope it helps!
Sunday, August 12, 2012
How to access Opera History in C#
Hi all!
Today, I will be continuing my series on getting browser history in C#. I am going to focus on Opera today. Opera is different from Chrome and Firefox, in the fact that it does not use an SQLite Database to store browser history. Instead, it uses a text file. Each URL entry has four lines. The first line is the title, the second is the URL, the third is the time visited in Unix, or Epoch, time, and the last is the frequency. You can find this file in your appdata folder, by typing %appdata% into run, then browsing to Opera/Opera/global_history.dat and opening it with a text editor, such as NotePad++. Here is an example of my file:
The default frequency, for a site that has been visited one time, is -1. If it has been visited more than once, it will rise up into the millions. I am not sure how the frequency corresponds to the number of visits. If you know, please tell me.
To access this in C#, you will need to read the file line by line, and determine if the line is the title, url, etc. I have come up with this code that should help you:
This script also reuses the URL class from my post on IE history. I have commented on most parts of this, so it should be easy to understand. This is the underlying method on how to get Opera's history with C#.
If you have any more questions or comments, please let me know!
To access this in C#, you will need to read the file line by line, and determine if the line is the title, url, etc. I have come up with this code that should help you:
public IEnumerableNote: To use this, you will need to include:GetHistory(bool display) { // Get Current Users App Data string documentsFolder = GetFolder(); //If directory exists if (Directory.Exists(documentsFolder)) { //This is the line number of the history file int lineNumber = 1; //This is the history file in the documents folder string historyFile = documentsFolder + "global_history.dat"; //URL Variables string title = null; string url = null; int frequency = 0; DateTime visited = new DateTime(); //These variables tell you if each line has been parsed //and each part has been assigned bool urlAssigned = false; bool titleAssigned = false; bool frequencyAssigned = false; bool visitedAssigned = false; //The url to assign to the URL table URL u; //Create a new StreamReader using the history file //to read the file line by line System.IO.StreamReader file = new System.IO.StreamReader(historyFile); //The line that is being read string line; //While the line that is being read is being read by //file.ReadLine, and is not null while ((line = file.ReadLine()) != null) { /*This is a table of what each line is * Line 1 = The Title of the URL * Line 2 = The URL of the URL * Line 3 = The Unix Time of which the URL was visited * Line 4 = The frequency of visits, which cannot convert */ //If the line number is the first, or if the line number minus 1 //is a multiple of 4, for example, line number 5 - 1 is 4, which //is a multiple of 4 if (lineNumber == 1 || (lineNumber - 1) % 4 == 0) { Debug.WriteLine(line); title = line; titleAssigned = true; } //If line number is the second, or line number - 2 is a multiple //of 4, ex. 6 - 2 = 4, which is a multiple of 4 if (lineNumber == 2 || (lineNumber - 2) % 4 == 0) { url = line; urlAssigned = true; } //If the line number is the third, or if line number - 3 is a //multiple of 4, ex. 7 - 3 = 4 if (lineNumber == 3 || (lineNumber - 3) % 4 == 0) { //If the line is the correct length for Unix time if (line.Length == 10) { //then convert the number to a local datetime visited = FromUnixTime(Int64.Parse(line)).ToLocalTime(); } else MessageBox.Show("An error occured while parsing the date \n" + line); visitedAssigned = true; frequencyAssigned = true; } //If all of the values have been assigned if (urlAssigned == true && titleAssigned == true && frequencyAssigned == true && visitedAssigned == true) { //create a new URL with the values u = new URL(url, title, "Opera", visited, frequency); //And add the URL to the URLs array URLs.Add(u); //Reset the assigned values urlAssigned = false; titleAssigned = false; frequencyAssigned = false; visitedAssigned = false; } if (lineNumber == 4000 || file.EndOfStream == true) { MessageBox.Show("done " + URLs.Count.ToString()); } lineNumber++; } } return URLs; } private static string GetFolder() { string folder = "\\Opera\\Opera\\"; string documentsFolder = Environment.GetFolderPath (Environment.SpecialFolder.ApplicationData); documentsFolder += folder; return documentsFolder; } public DateTime FromUnixTime(long unixTime) { var epoch = new DateTime(1970, 1, 1, 0, 0, 0); return epoch.AddSeconds(unixTime); }
using System.Diagnostics; using System.IO;
This script also reuses the URL class from my post on IE history. I have commented on most parts of this, so it should be easy to understand. This is the underlying method on how to get Opera's history with C#.
If you have any more questions or comments, please let me know!
Friday, June 29, 2012
How to access Internet Explorer History in C#
So, you want to know how to access history for various browsers in C#? I found it very difficult to get it working correctly, so here is my top choices for Chrome, Firefox, and IE history code.
Internet Explorer
First off, here is IE. IE is, I think, the easiest history to be obtained. Browser history for IE is stored in the registry key of HKEY_CURRENT_USER\Software\Microsoft\Internet Explorer\TypedURLs. Now, Microsoft has published an interface on IUrlHistory, however that was not a C# wrapper. So, an article on CodeProject has a UrlHistoryLibrary.dll file which allows access to read and modify IE history.
The article shows how to to use the whole interface, however here is some prewritten code for returning IE history:
public class IE { public IEnumerable<URL> GetHistory() { UrlHistoryWrapperClass urlHistory; UrlHistoryWrapperClass.STATURLEnumerator enumerator; List<STATURL> list = new List<STATURL>(); urlHistory = new UrlHistoryWrapperClass(); enumerator = urlHistory.GetEnumerator(); enumerator.GetUrlHistory(list); List<URL> URLs = new List<URL>(); foreach (STATURL url in list) { string browser = "-- Internet Explorer"; bool containsBoth = url.URL.Contains("file:///"); if (url.Title != "" && containsBoth == false){ Console.WriteLine(String.Format("{0} {1} {2}", url.Title, url.URL, browser)); Thread.Sleep(500); } } return URLs; } }Here is the URL class:
public class URL { string url; string title; string browser; public URL(string url, string title, string browser) { this.url = url; this.title = title; this.browser = browser; } }Here is how you use this code:
- Go to the Codeproject page, and download the demo project. You may have to sign up for a free account. Now, open up the "UrlHistoryLibrary" project in Visual Studio and then build it. You should now have a "UrlHistoryLibrary.dll" file in /bin/debug.
- Now, create a new console project in Visual Studio. I use the 2010 Pro version.
- Right click the "References" folder, in the Solution Explorer, and choose the option to "Add Reference". Now, select the "Browse" folder and navigate into your "UrlHistoryLibrary/Bin/Debug" folder and select "UrlHistoryLibrary.dll".
- Now, in your references, add
using UrlHistoryLibrary; using System.Diagnostics; using System.Threading;
- Now, add the above IE class to your code. Right under that, outside of the IE class, add the URL class.
- Add a main class, or public static void Main(string[] args). Inside of that, include the following:
Process[] process_IE = Process.GetProcessesByName("iexplore"); if (process_IE.Length == 0) { IE ie = new IE(); ie.GetHistory(); } else Console.WriteLine("Sorry, IE is open. Please close IE and try again.");
- Now, when you run your console program, you should get a list of History visited, in the format of Title, Url, Broswer.
A few notes:
- I have modified this a bit from the original code. I have made it so that the results will not display results with "file:///" in the url. It will also not display any empty titles.
- In the main function, I have added a check that will tell you if you have IE open, when you try to run. If so, it will give you an error message.
- I have added a 5 second delay between each URL.
Here is the complete tested source code:
using System; using System.Collections.Generic; using System.Linq; using System.Text; using System.Diagnostics; using System.Threading; using UrlHistoryLibrary; namespace BlogTestIE { class Program { static void Main(string[] args) { Process[] process_IE = Process.GetProcessesByName("iexplore"); if (process_IE.Length == 0) { IE ie = new IE(); ie.GetHistory(); } else Console.WriteLine("Sorry, IE is open. Please close IE and try again."); } } public class IE { public IEnumerableGetHistory() { UrlHistoryWrapperClass urlHistory; UrlHistoryWrapperClass.STATURLEnumerator enumerator; List list = new List (); urlHistory = new UrlHistoryWrapperClass(); enumerator = urlHistory.GetEnumerator(); enumerator.GetUrlHistory(list); List URLs = new List (); foreach (STATURL url in list) { string browser = "-- Internet Explorer"; bool containsBoth = url.URL.Contains("file:///"); if (url.Title != "" && containsBoth == false) { Console.WriteLine(String.Format("{0} {1} {2}", url.Title, url.URL, browser)); Thread.Sleep(500); } } return URLs; } } public class URL { string url; string title; string browser; public URL(string url, string title, string browser) { this.url = url; this.title = title; this.browser = browser; } } }
Labels:
.Net,
C#,
Visual Studio
Wednesday, June 20, 2012
Download and Convert Youtube videos to MP3 -- No Ads
I came across a very cool site, and it allows you to convert any Youtube video to Full Quality MP3 Files, that you can use with iTunes, WMP, or your MP3 Player. This site has no ads and it can even give you a button on a YouTube Video page to convert videos.
You can find this site here, and install the YouTube Firefox or Chrome extension here. Below is a video on how to get started:
Sunday, June 3, 2012
Download from Premium file hosting sites for free
This summary is not available. Please
click here to view the post.
Labels:
Download
Unity 3d Multiplayer Video Tutorials
Unity3d is a game development software that has many features, including multiplayer capabilities and multiple programming languages.
Sometimes, however, it is very hard to get started making these games without an experienced guide. Over at Gamer To Game Developer website, that is what is happening. In series 1, he gets you started in making the base of a very professional multiplayer game, similar to Laser Tag, where each player has multiple weapons, and you must hit players of the other team. They are in YouTube format, and are from 10 minutes to 2 hours. Best of all, these videos are completely free. You can find them at the Gamer To Game Developer Website.
If you are looking to make a MMO type game, then head over to 3dbuzz.com. For only $35 a month, you get access to unlimited video tutorials for Blender, Unity, 3dsMax, and more. They have an all new MMO Developer class, where they walk you through every step of making your own MMO, using Unity3d game development software, and the Photon server backend. This is well worth the money.
Labels:
Unity3d
SimCity 5 Release date announced
Recently, Maxis and EA have narrowed the release window for their new game, SimCity 5, to February of 2013. It is very surprising to find the date this early, seeing how they had a very generic "2013" date previously.
Labels:
Simcity
Friday, May 25, 2012
How to Download .Torrent file from The Pirate Bay
Recently, The Pirate Bay has disabled you from downloading the .torrent files from torrents, in favor of the new "Magnet Links.", so here is a trick to get the .torrent files back. This has worked for any file I have tested so far.
- Get the link of your torrent you want to download, for example http://thepiratebay.se/torrent/7251952/
- Find the number in your torrent link, which in my case is 7251952.
- Now, use this template to get a torrent file: "http://torrents.thepiratebay.se/NUMBER/NAME.torrent". NUMBER is the number you wrote down earlier, and NAME is whatever you want your torrent file to be called.
My example is "http://torrents.thepiratebay.se/7251952/torrent.torrent"
Just hit enter and your download will start!
Labels:
Download,
The Pirate Bay,
Torrent
Wednesday, April 4, 2012
How to get a free EDU email address
There are many reasons for wanting an EDU email address. You can get free Amazon Prime, and many free student software from places like Autodesk. It is a simple process to get a free email from colleges. In this case, we are going to use Maricopa Community College.
- In a new tab or windows, go to this link, the "Fake Name Generator".
- Create a new identity and copy the information down somewhere.
- Navigate to this link in your browser.
- Next, check the box that says "I am a new student and have never attended any Maricopa Community College or Skill Centers.". Enter the validation code and press "Next".
- From the name generator, enter in the SSN, name, and other information, and click "Next".
- Click "Ok" if all the information is how you want.
- Again, you will have to enter all of the required information in from the name generator. At the bottom of the page, you will have to enter a current email address and a password for your new account.
- Now, you will have to enter a secutity question. Then, click next.
- After you have done that, you will see a screen with information on it. THIS IS IMPORTANT. COPY YOUR MEID AND YOUR EMAIL ADDRESS DOWN.
- Now, to log in, you will have to go here to log in,, enter your MEID and password, and you can log in and use your new EDU email account!
Note that you may need to wait 20-30 minutes before you can log in to your new account.
Comment for help!
Saturday, February 18, 2012
Get Netflix on a modded PlayStation 2
UPDATE: As of March 2012, Netflix has discontinued Netflix For PS2, so this will not work anymore.
Netflix, the standard in streaming video, has set up console streaming from everything from Blu-ray to the Xbox, but there is still no support for the PS2, until now. In order to do this, you must have a modded PS2, either with FreeMcBoot or a modchip. I will show you with FMCB.
NOTE THAT YOU MUST HAVE A WORKING NETWORK ADAPTER.
2. Insert your USB drive into your computer. It must be at least 2 GB. You may need to format your drive to have enough space. Formatting will delete all data on the drive. THE DRIVE MUST BE FAT32 file system.
3. Open your flash drive and create two folders in it, one called "DVD", and one called "CD". These must be all caps. Open the RAR file you downloaded earlier and extract it to the DVD folder on your flash drive. You can use WinRAR, or the free 7-zip.
4. Open My Computer and navigate to your flash drive. Right click on the .iso file, click rename, and rename it to "SLUS_219.49.Netflix.iso". For more information about naming games, see this page.
5. If you do not already have OPL, you will have to get it. Download it here, then extract the zip file onto the root of your flash drive.
6. Unplug the flash drive from your computer, and connect it to your PS2 using one of the USB ports on the front of your console.
7. Turn on your console with your FMCB memory card in one of the two slots. See my other posts if you dont have a FMCB mc.
8. Scroll down to uLaunchELF.
9. Press O for the file system, and then use the arrow keys to navigate to "mass:" then press O again.
10. Scroll down until you see OPNPS2LD.ELF and press O to open it.
11. You should now see the OPL screen. If this is the first time you have run OPL, then you will have to set up the settings. To do this, highlight settings,and press X.
12. Scroll to highlight "USB", press X, then use the up and down arrows to where it shows Auto.
13. Press triangle to exit, then scroll to "Save changes", then press X.
14. Once it has saved, press O to return to the settings menu, and press Start to go to the USB menu. If all goes well, you should Netflix as one of the game choices. Before you start the game, you will have to enable mode 3 for sound.
15. To do this, press triangle for game settings, and scroll to mode 3. Press X, and make sure it says "Mode 3: ON".
16. Scroll to save changes, then press X to save. Once done, you can press X to start Netflix!
If it works, you should see colorful colors, then Netflix loading, then it should ask you for your Netflix account. If you can to that, than you are good!
Troubleshooting:
If you are stuck at Netflix infinately loading, you can try two things.
One, your memory card in slot one is full or not inserted.
Two, you may need to set up network settings. See this OPL Page for info.
If you need any more help, Just Comment!
Netflix, the standard in streaming video, has set up console streaming from everything from Blu-ray to the Xbox, but there is still no support for the PS2, until now. In order to do this, you must have a modded PS2, either with FreeMcBoot or a modchip. I will show you with FMCB.
NOTE THAT YOU MUST HAVE A WORKING NETWORK ADAPTER.
1. First, you need to download the iso. You can get it here.
2. Insert your USB drive into your computer. It must be at least 2 GB. You may need to format your drive to have enough space. Formatting will delete all data on the drive. THE DRIVE MUST BE FAT32 file system.
3. Open your flash drive and create two folders in it, one called "DVD", and one called "CD". These must be all caps. Open the RAR file you downloaded earlier and extract it to the DVD folder on your flash drive. You can use WinRAR, or the free 7-zip.
4. Open My Computer and navigate to your flash drive. Right click on the .iso file, click rename, and rename it to "SLUS_219.49.Netflix.iso". For more information about naming games, see this page.
5. If you do not already have OPL, you will have to get it. Download it here, then extract the zip file onto the root of your flash drive.
6. Unplug the flash drive from your computer, and connect it to your PS2 using one of the USB ports on the front of your console.
7. Turn on your console with your FMCB memory card in one of the two slots. See my other posts if you dont have a FMCB mc.
8. Scroll down to uLaunchELF.
9. Press O for the file system, and then use the arrow keys to navigate to "mass:" then press O again.
10. Scroll down until you see OPNPS2LD.ELF and press O to open it.
11. You should now see the OPL screen. If this is the first time you have run OPL, then you will have to set up the settings. To do this, highlight settings,and press X.
12. Scroll to highlight "USB", press X, then use the up and down arrows to where it shows Auto.
13. Press triangle to exit, then scroll to "Save changes", then press X.
14. Once it has saved, press O to return to the settings menu, and press Start to go to the USB menu. If all goes well, you should Netflix as one of the game choices. Before you start the game, you will have to enable mode 3 for sound.
15. To do this, press triangle for game settings, and scroll to mode 3. Press X, and make sure it says "Mode 3: ON".
16. Scroll to save changes, then press X to save. Once done, you can press X to start Netflix!
If it works, you should see colorful colors, then Netflix loading, then it should ask you for your Netflix account. If you can to that, than you are good!
Troubleshooting:
If you are stuck at Netflix infinately loading, you can try two things.
One, your memory card in slot one is full or not inserted.
Two, you may need to set up network settings. See this OPL Page for info.
If you need any more help, Just Comment!
Labels:
Netflix,
Playstation 2,
PS2
Tuesday, February 7, 2012
How To Get Pattern Unlock on the Kindle Fire With Root
This will allow you to get a custom lock screen, the GoLocker, onto the kindle fire and working so that you can have pattern unlock and different themes. Here is how you do this: Note that you must have root.
1. Download NoLock
2. Disable stock lock screen security
3. Using Es File Explorer or root explorer, copy org.jraf.android.nolock.apk from /data/app/ to /system/app/.
4. Restart
5. Install Go Launcher from the market.
6. Open Go Launcher, then go to menu - preferences - visual settings - go locker - then select go locker enabled.
7. Configure go locker security under security lock
8. Use go launcher and open No Lock, then click the big disable button.
Another way to install no lock is to use titanium backup and change no lock to system app.
The problem with that is, on restart, there is no notification or menu bar. To work around this:
1. Install SwipePad from the market
2. configure one of swipepads slots for no lock
3. On reboot, drag swipepads hotspot to the center, select no lock, then enable and disable locking.
Hope it helps!
Labels:
Kindle Fire
Sunday, January 29, 2012
Buy a PS2 Memory Card modded with Free McBoot
Earlier, I did a post about how you can mod your PS2 using the game swap trick. Some people (like myself) dont want to go to all of that trouble (like I dont have a dvd burner).
Here at a cool site called The ISO Zone, they have lots of cool tricks, things like netflix and emulators, for you to download for your XBox, PS2, whatever. Here at their marketplace, a seller called VGA is selling pre-modded official PS2 memory card with a cool guide and software for only $15! It ships to your house in 2-3 days (besides me, because I ordered on a Saturday, and Lucky Me, the USPS doesnt work on Sunday.) It truly is a good value.
You can purchase this from The ISO Zone here.
NOTE: As someone commented below, there is another site that sells these for £12.95. You can find this here.
UPDATE: Version 2 kits are now shipping. These new kits include: More Tutorials, More Tools on the Apps CD, and a Free PS2 Game!
Labels:
Playstation 2,
PS2
Arrange Windows Side by Side in Windows XP
Have you ever wanted to show two, three, or however many windows side by side?
Well, it really is easy. Just control-click without lifting control on all of the windows you want in the taskbar, then right click them. From their, you can either press title horizontally or title vertically.
It's that easy!
Well, it really is easy. Just control-click without lifting control on all of the windows you want in the taskbar, then right click them. From their, you can either press title horizontally or title vertically.
It's that easy!
Labels:
Windows
Windows - Scroll Background windows like Mac and Linux
A cool little feature I like in Mac OSX and Ubuntu is the ability to scroll pages in the background, so if you have an internet window open and a Word document open, you can easily access information from both of them without having to click it into the foreground.
A tool that can do this in Windows is called WizMouse. WizMouse has the ability to scroll in the background, along with other features such as bringing the scrolled window into the foreground and Reverse Mouse Scrolling like in OSX, plus it is very tiny and hardly takes up any resources!
You can download WizMouse here.
Labels:
Windows
Sunday, January 8, 2012
How to Access PSN Bypassing PS3 Firmware 3.21 Upgrade for OtherOS
So, while looking through the web, I found this article, which showes how to prevent the 3.21 firmware update, while still allowing PSN to retain OtherOS functionality, or the ability to run linux.
Monday, January 2, 2012
How To Mod Your PS2 Using the Game Swap Trick
Modding your playstation allows you to do things such as run backup iso's, access the media player, install PS2 Linux, run homebrew, and more. Here is a simple way to softmod your PS2:
You will need:
- A thumbdrive
- 007 Agent Under Fire or any other of the compatible games on this list
- Good quality DVD-R
- A DVD Burner
- Apache V1.1
- IMG Burn
- uLaunchElf
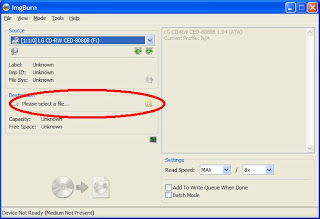
1. Make an iso of the game you want by putting it in your dvd drive, starting IMG Burn, then select the second option down. Now, select your destination.
2. Now, extract the uncompressed boot.elf and rename it to driving.elf (or the equivalent for your game.)
3.Download , extract, and run Apache. Open the iso file you made earlier with Apache.
4. Click on driving.elf on the right side.
5. Go to the top and select "iso tools", then press "change TOC for selected file".
6. Change the size (dec) to 915196
7. Navigate in explorer to the "uncompressed boot.elf" you downloaded earlier, right click, then select rename. Rename it to "DRIVING.ELF"
8. In Apache, select driving.elf again, go to "iso tools", and this time select "Update Selected File"
9. Navigate to where you downloaded the boot.elf and renamed it to "driving.elf". Select that file for Apache.
10. It will say "Selected File Replaced"
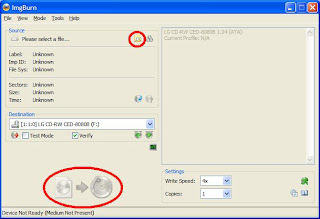
11. Go back into imgburn. Insert a new blank DVD-R into your dvd writer, and in imgburn, select "Write Image File to Disk".
12. Under Source, click on the folder button to the write and select the iso file you edited earlier (it will be the same one you made from the disk.)
13. Write it to disk.
14. Now comes the hard part. You will have to either open up your ps2 to do the swap, or use the slide card trick. You can find videos on both of them.
15. Now, load 007 on the PS2. Play the first level, then save.
16. Go to the Main Menu and swap the original disk for the backup you made earlier using your preferred method.
17. Now, play the second level. If you did it right, you will see a screen like this:
18. On your computer, copy the FMCB Noobie package, which you can find here, to your flash drive. Now, put the drive in your ps2 USB slot.
19. Press circle.
20. Scroll to "mass:/" and press circle
21. Highlight "FREE_MCBOOT.ELF" and press circle. You now should see this:
22. Select either multi-version install (if you want to use the memory card on more than one PS2) or normal install.
23. Once you choose which memory card to install to, you should be done! Now you can enjoy your modded PS2.
If you need help at any time, leave a comment or look:
Thanks for reading!
Labels:
Playstation 2,
PS2
Sunday, January 1, 2012
How To Fix The Sims 3 NaN Android Error
If you have recently tried to play The Sims 3 on your android device, you know that you get an error when you try to download the data files. Try this simple fix:
1. Download and install The Sims 3 from the Android Market.
2. Download this file. These are the files it tries to download.
3. Extract the files out of the zip file.
4. Mount your android device on your computer and copy "com.eamobile.sims3_na_qwf" from the zip file, then paste the folder in your /sdcard/android/data/ directory.
5. Open the Sims 3 and play!
This should work with all devices that have the NaN error. If it does not work, ensure the app is on the SD card by using App2SD from the market. You can also download the file straight from your android device and extract it to /sdcard/android/data/.
Subscribe to:
Posts (Atom)